
Ever tried uninstalling Google Chrome… but it still comes back like it never left?
You delete it, reinstall another browser, and suddenly Chrome is still saving data, running in the background, or even popping up again. Frustrating, right?
Here’s the truth… simply clicking “Uninstall” is NOT enough.
If you’re searching for how to uninstall Google Chrome completely from your system, this guide will walk you through every step — including hidden files most people forget.
By the end, Chrome will be 100% removed, with no leftovers.
Why You Might Want to Uninstall Google Chrome Completely
Let’s be honest — Chrome is popular, but it’s not perfect.
Here are some common reasons people want to remove it entirely:
- High RAM usage slowing down your system
- Privacy concerns (tracking, sync data)
- Switching to alternatives like Edge, Firefox, or Brave
- Corrupted installation causing crashes
- Too many background processes
👉 But here’s where it gets interesting…
Even after uninstalling, Chrome often leaves behind:
- Cache files
- User data
- Registry entries (on Windows)
And these leftovers can affect performance or reinstall behavior.
Quick Summary (Featured Snippet Ready)
To uninstall Google Chrome completely:
- Uninstall Chrome from Control Panel (Windows) or Applications (Mac)
- Delete leftover Chrome folders (AppData / Library)
- Remove registry entries (Windows only)
- Restart your system
Main Guide: Step-by-Step to Remove Chrome Completely
Step 1: Uninstall Google Chrome Normally
For Windows
- Press Windows + R
- Type
appwiz.cpland hit Enter - Find Google Chrome
- Right-click → Click Uninstall

✔ Optional: Tick “Also delete your browsing data”
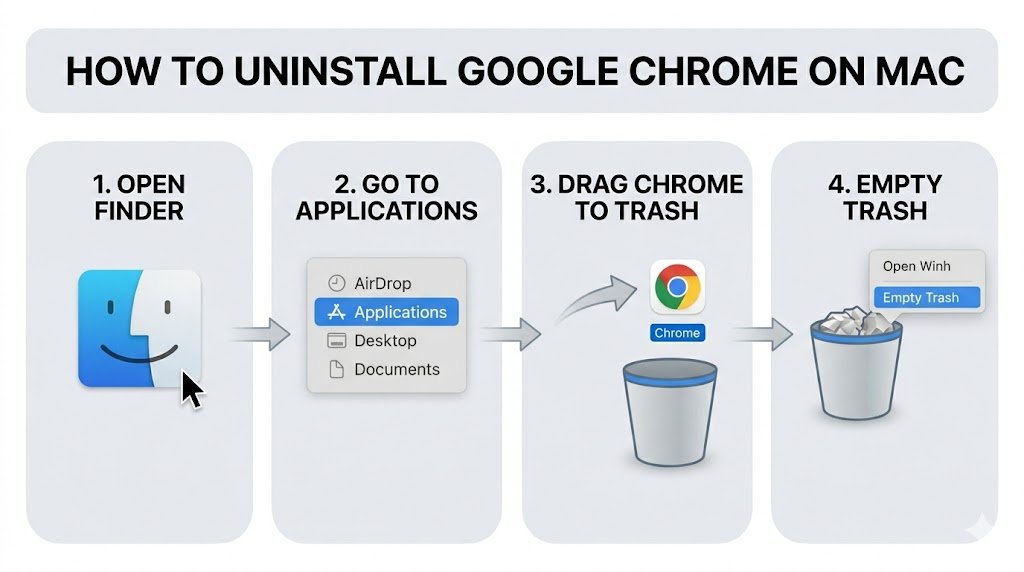
For Mac
- Open Finder
- Go to Applications
- Drag Google Chrome to Trash
- Empty Trash
Step 2: Delete Leftover Files (IMPORTANT)
Most people stop at Step 1… but this is where the real cleanup happens.
On Windows
- Press Windows + R
- Type:
%localappdata%
- Find and delete the folder:
Now repeat:
%appdata%
Delete the Google folder again.
On Mac
- Open Finder
- Press Command + Shift + G
- Type:
~/Library/Application Support/
- Delete:
- Google/Chrome
Also check:
~/Library/Caches/~/Library/Preferences/
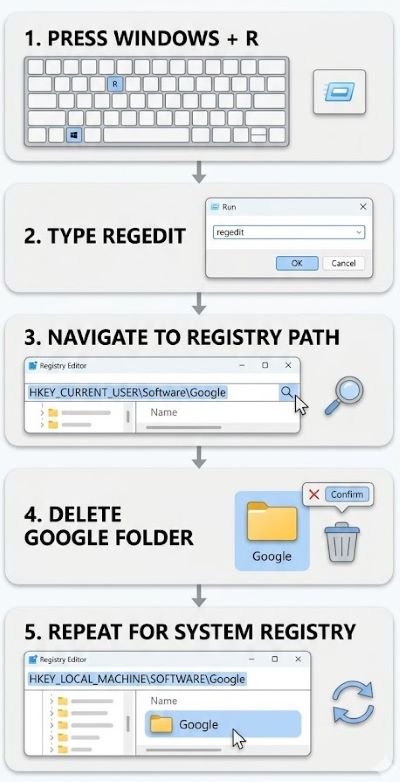
Step 3: Remove Registry Entries (Windows Only)
⚠️ Be careful here — this is advanced but powerful.
- Press Windows + R
- Type
regedit - Navigate to:
HKEY_CURRENT_USER\Software\Google
- Delete the Google folder
Repeat for:
HKEY_LOCAL_MACHINE\SOFTWARE\Google
Step 4: Restart Your System
This ensures:
- Background processes are cleared
- Changes are applied properly
Advanced / Alternative Method (Faster Way)
If you want a quicker and more professional solution…
Use Uninstaller Tools
These tools automatically remove:
- Programs
- Leftover files
- Registry entries
Popular options:
- Revo Uninstaller
- IObit Uninstaller
- CCleaner
Manual vs Advanced Method (Comparison Table)
| Feature | Manual Method | Uninstaller Tool |
|---|---|---|
| Ease of Use | Medium | Very Easy |
| Removes leftovers | Yes (if done right) | Yes (automatic) |
| Time Required | 10–15 minutes | 3–5 minutes |
| Risk Level | Medium (registry editing) | Low |
👉 Recommendation:
Use tools if you’re not comfortable with technical steps.
Limitations & Common Mistakes
Even smart users make these mistakes…
❌ 1. Not deleting AppData files
Chrome keeps user data hidden here.
❌ 2. Forgetting registry cleanup
This can cause reinstall issues.
❌ 3. Running Chrome during uninstall
Always close all Chrome processes.
❌ 4. Sync still active
Your data may reappear if synced with Google account.
Pro Tips (Most People Don’t Know This)
💡 Tip #1: Disable Chrome sync before uninstalling
Go to Settings → Turn off Sync
💡 Tip #2: Check Task Manager
End all Chrome processes before uninstall
💡 Tip #3: Backup bookmarks first
Export bookmarks to avoid losing important links
💡 Tip #4: Use Safe Mode (Windows)
For stubborn uninstall issues
💡 Tip #5: Clear DNS cache after uninstall
This avoids leftover network traces
FAQ Section (People Also Ask)
1. Will uninstalling Chrome delete all my data?
Only if you select the option during uninstall. Otherwise, some data may remain in system folders.
2. Why does Chrome reinstall automatically?
Because of:
- Sync enabled
- Leftover files
- Other apps triggering installation
3. Can I reinstall Chrome later?
Yes, you can reinstall it anytime from the official website.
4. Is it safe to delete registry entries?
Yes, but only Chrome-related entries. Be careful not to delete unrelated keys.
5. What is the best alternative to Chrome?
Popular options include:
- Mozilla Firefox
- Microsoft Edge
- Brave Browser
6. Why is Chrome using so much RAM?
Chrome runs multiple processes for tabs, extensions, and security — which increases memory usage.
Conclusion
Removing Chrome completely isn’t just about uninstalling — it’s about cleaning every hidden trace.
If you follow this guide step-by-step, your system will be:
✔ Cleaner
✔ Faster
✔ Free from leftover Chrome data
Now it’s your turn.
Go ahead and uninstall Google Chrome completely from your system — the right way.
And if Chrome has been slowing you down… this might be the upgrade your PC needed. 🚀


Helpful information, thanks for sharing.