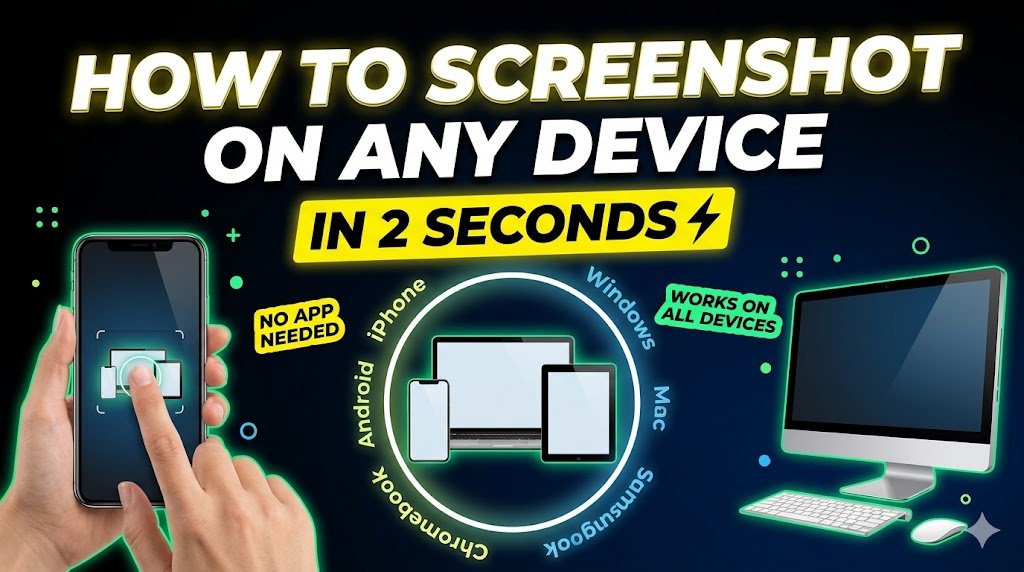
Quick Answer (Featured Snippet)
To take a screenshot, press Print Screen (Windows) or Command + Shift + 3 (Mac). On smartphones, press Power + Volume Down. Screenshots are saved automatically or copied to your clipboard, depending on the method. You can edit, share, or save them instantly.
Introduction
Ever wanted to capture something on your screen… but didn’t know how?
Maybe it’s an important message, a payment receipt, or something funny you want to share. Knowing how to take a screenshot is one of the most useful digital skills today.
Here’s the truth…
Most people only know one method — but there are multiple faster, smarter, and more advanced ways depending on your device.
In this guide, you’ll learn every possible method — from basic to pro level.
Why Taking a Screenshot is Important
Screenshots aren’t just for fun — they’re extremely practical.
Common Uses:
- Save important information instantly
- Share errors with tech support
- Capture social media posts
- Keep proof of transactions
- Create tutorials or guides
👉 But here’s where it gets interesting…
Using the right method can save time and improve quality.
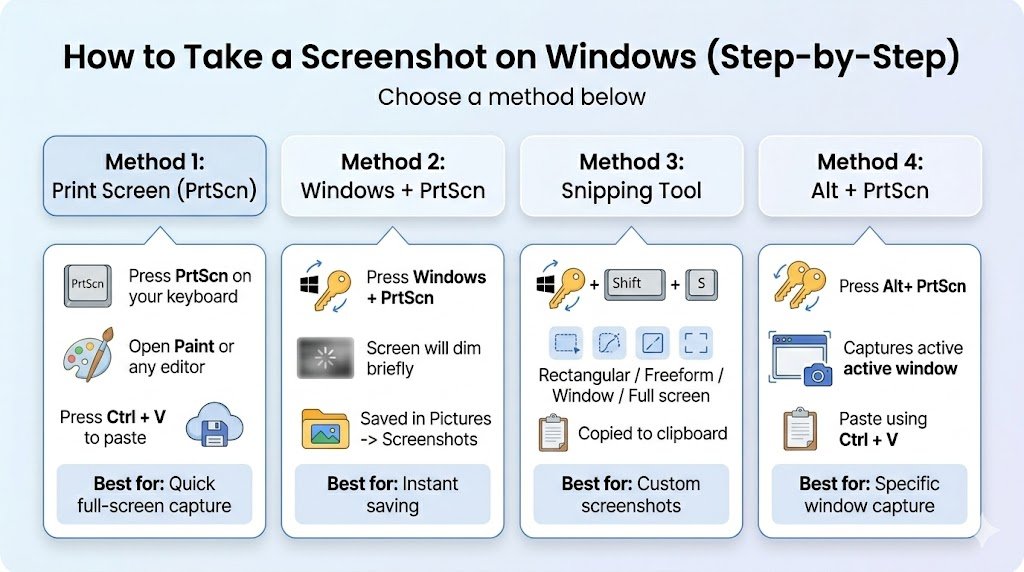
How to Take a Screenshot on Windows (Step-by-Step)
Method 1: Print Screen (PrtScn)
- Press PrtScn on your keyboard
- Open Paint or any editor
- Press Ctrl + V to paste
- Save the file
✔ Best for: Quick full-screen capture
Method 2: Windows + Print Screen (Auto Save)
- Press Windows + PrtScn
- Screen will dim briefly
- Screenshot saved in:
- Pictures → Screenshots
✔ Best for: Instant saving
Method 3: Snipping Tool / Snip & Sketch
- Press Windows + Shift + S
- Select capture type:
- Rectangular
- Freeform
- Window
- Full screen
- Screenshot is copied to clipboard
✔ Best for: Custom screenshots
Method 4: Alt + Print Screen
- Press Alt + PrtScn
- Captures only active window
- Paste using Ctrl + V
✔ Best for: Specific window capture
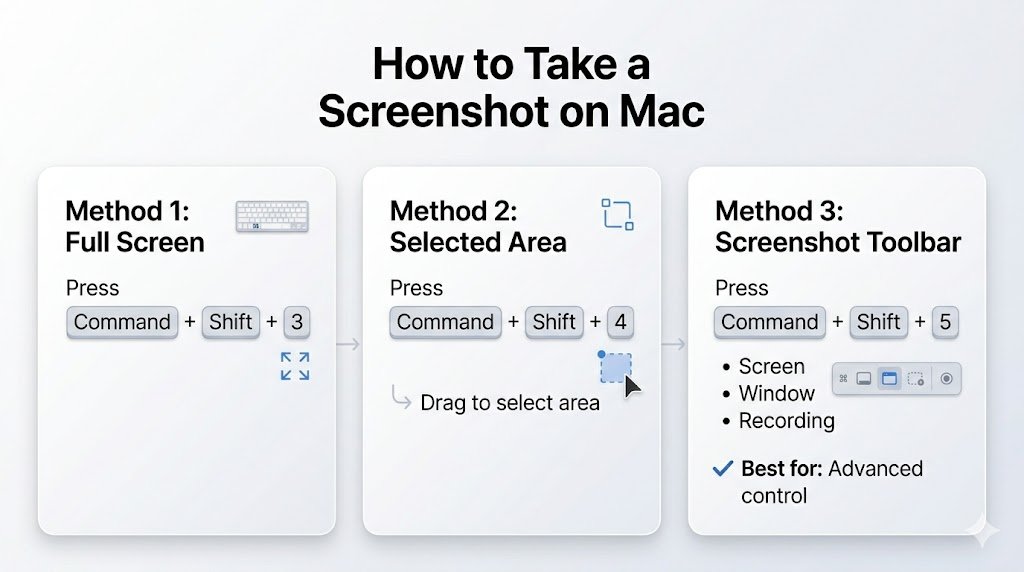
How to Take a Screenshot on Mac
Method 1: Full Screen
- Press Command + Shift + 3
Method 2: Selected Area
- Press Command + Shift + 4
- Drag to select area
Method 3: Screenshot Toolbar
- Press Command + Shift + 5
- Choose:
- Screen
- Window
- Recording
✔ Best for: Advanced control
How to Take a Screenshot on Android
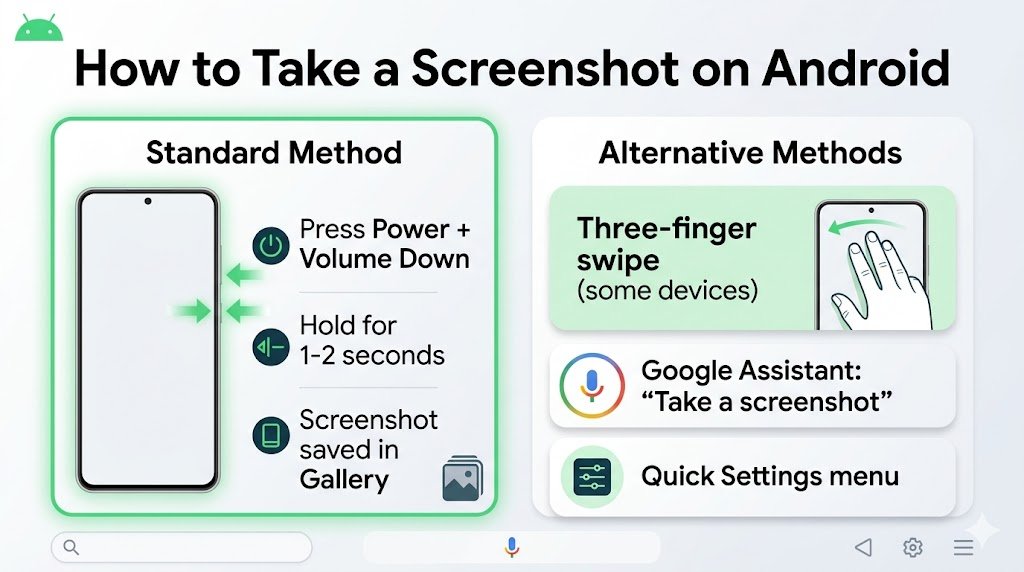
Standard Method
- Press Power + Volume Down
- Hold for 1–2 seconds
- Screenshot saved in Gallery
Alternative Methods
- Three-finger swipe (some devices)
- Google Assistant: “Take a screenshot”
- Quick Settings menu
How to Take a Screenshot on iPhone
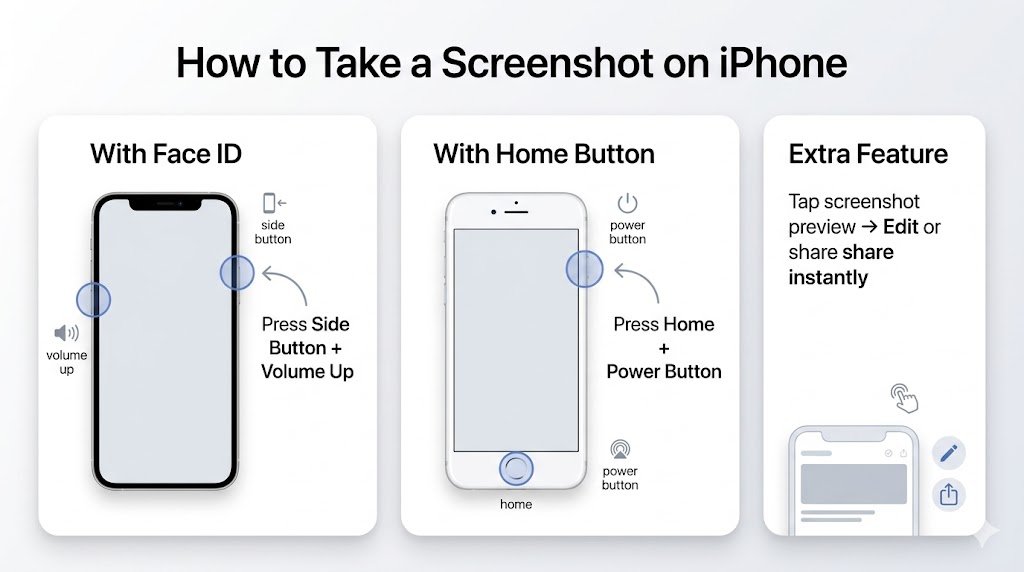
With Face ID
- Press Side Button + Volume Up
With Home Button
- Press Home + Power Button
Extra Feature
- Tap screenshot preview → Edit or share instantly
Advanced Screenshot Methods (Pro Level)
Most people don’t know these… but they’re game-changers.
1. Scrolling Screenshot (Full Page)
Capture an entire webpage:
- On Android: “Scroll Capture” option
- On iPhone: “Full Page” in Safari
- On Windows: Use browser extensions
2. Timed Screenshot (Mac)
- Open screenshot toolbar
- Set timer (5 or 10 seconds)
✔ Useful for menus and popups
3. Screen Recording
Sometimes a screenshot isn’t enough:
- Windows: Xbox Game Bar (Windows + G)
- Mac: Screenshot toolbar
- Mobile: Built-in screen recorder
Best Screenshot Tools & Software
If you want more power, try these tools:
Top Tools:
- Lightshot – Fast and simple
- Greenshot – Lightweight & free
- Snagit – Professional features
- ShareX – Advanced customization
Comparison Table
| Tool | Best For | Price |
|---|---|---|
| Lightshot | Quick sharing | Free |
| Greenshot | Basic editing | Free |
| Snagit | Professionals | Paid |
| ShareX | Advanced users | Free |
Real-Life Use Cases
Here’s how people actually use screenshots daily:
- Students: Save notes or lectures
- Business owners: Capture invoices or chats
- Freelancers: Share work progress
- Tech support: Report errors quickly
👉 Example:
Imagine your payment fails…
A screenshot can act as proof instantly.
Common Mistakes to Avoid
Even simple tasks can go wrong…
❌ 1. Not saving the screenshot
Clipboard screenshots disappear if not pasted.
❌ 2. Low-quality captures
Using wrong method reduces clarity.
❌ 3. Capturing sensitive info
Always blur passwords or personal data.
❌ 4. Wrong file format
PNG is best for quality, JPG for smaller size.
Pro Tips (Expert Level)
💡 Tip #1: Use keyboard shortcuts to save time
💡 Tip #2: Use PNG format for sharp images
💡 Tip #3: Crop immediately to remove clutter
💡 Tip #4: Use annotation tools for clarity
💡 Tip #5: Organize screenshots in folders
👉 Most people don’t know this…
You can auto-upload screenshots to cloud storage using tools like ShareX.
FAQ (People Also Ask)
1. How to take a screenshot on laptop?
Use PrtScn or Windows + Shift + S on Windows, or Command + Shift + 3 on Mac.
2. Where are screenshots saved?
- Windows: Pictures → Screenshots
- Mac: Desktop
- Mobile: Gallery/Photos
3. How to take a screenshot without buttons?
Use:
- On-screen tools (Snipping Tool)
- Voice assistant
- Gesture controls
4. How to take a long screenshot?
Use scrolling screenshot feature or browser extensions.
5. Why is my screenshot not working?
Possible reasons:
- Keyboard issue
- Storage full
- Permissions disabled
6. Can I edit screenshots after taking them?
Yes, most devices offer built-in editing tools.
Conclusion
Learning how to take a screenshot is simple… but mastering it can save you time, effort, and frustration.
From basic shortcuts to advanced tools, you now have everything you need.
Start using these methods today — and you’ll never struggle with screenshots again.
👉 And remember…
The faster you capture, the smarter you work. 🚀